

Pickled Eggs: Using Leftover Pickled Beet Brine
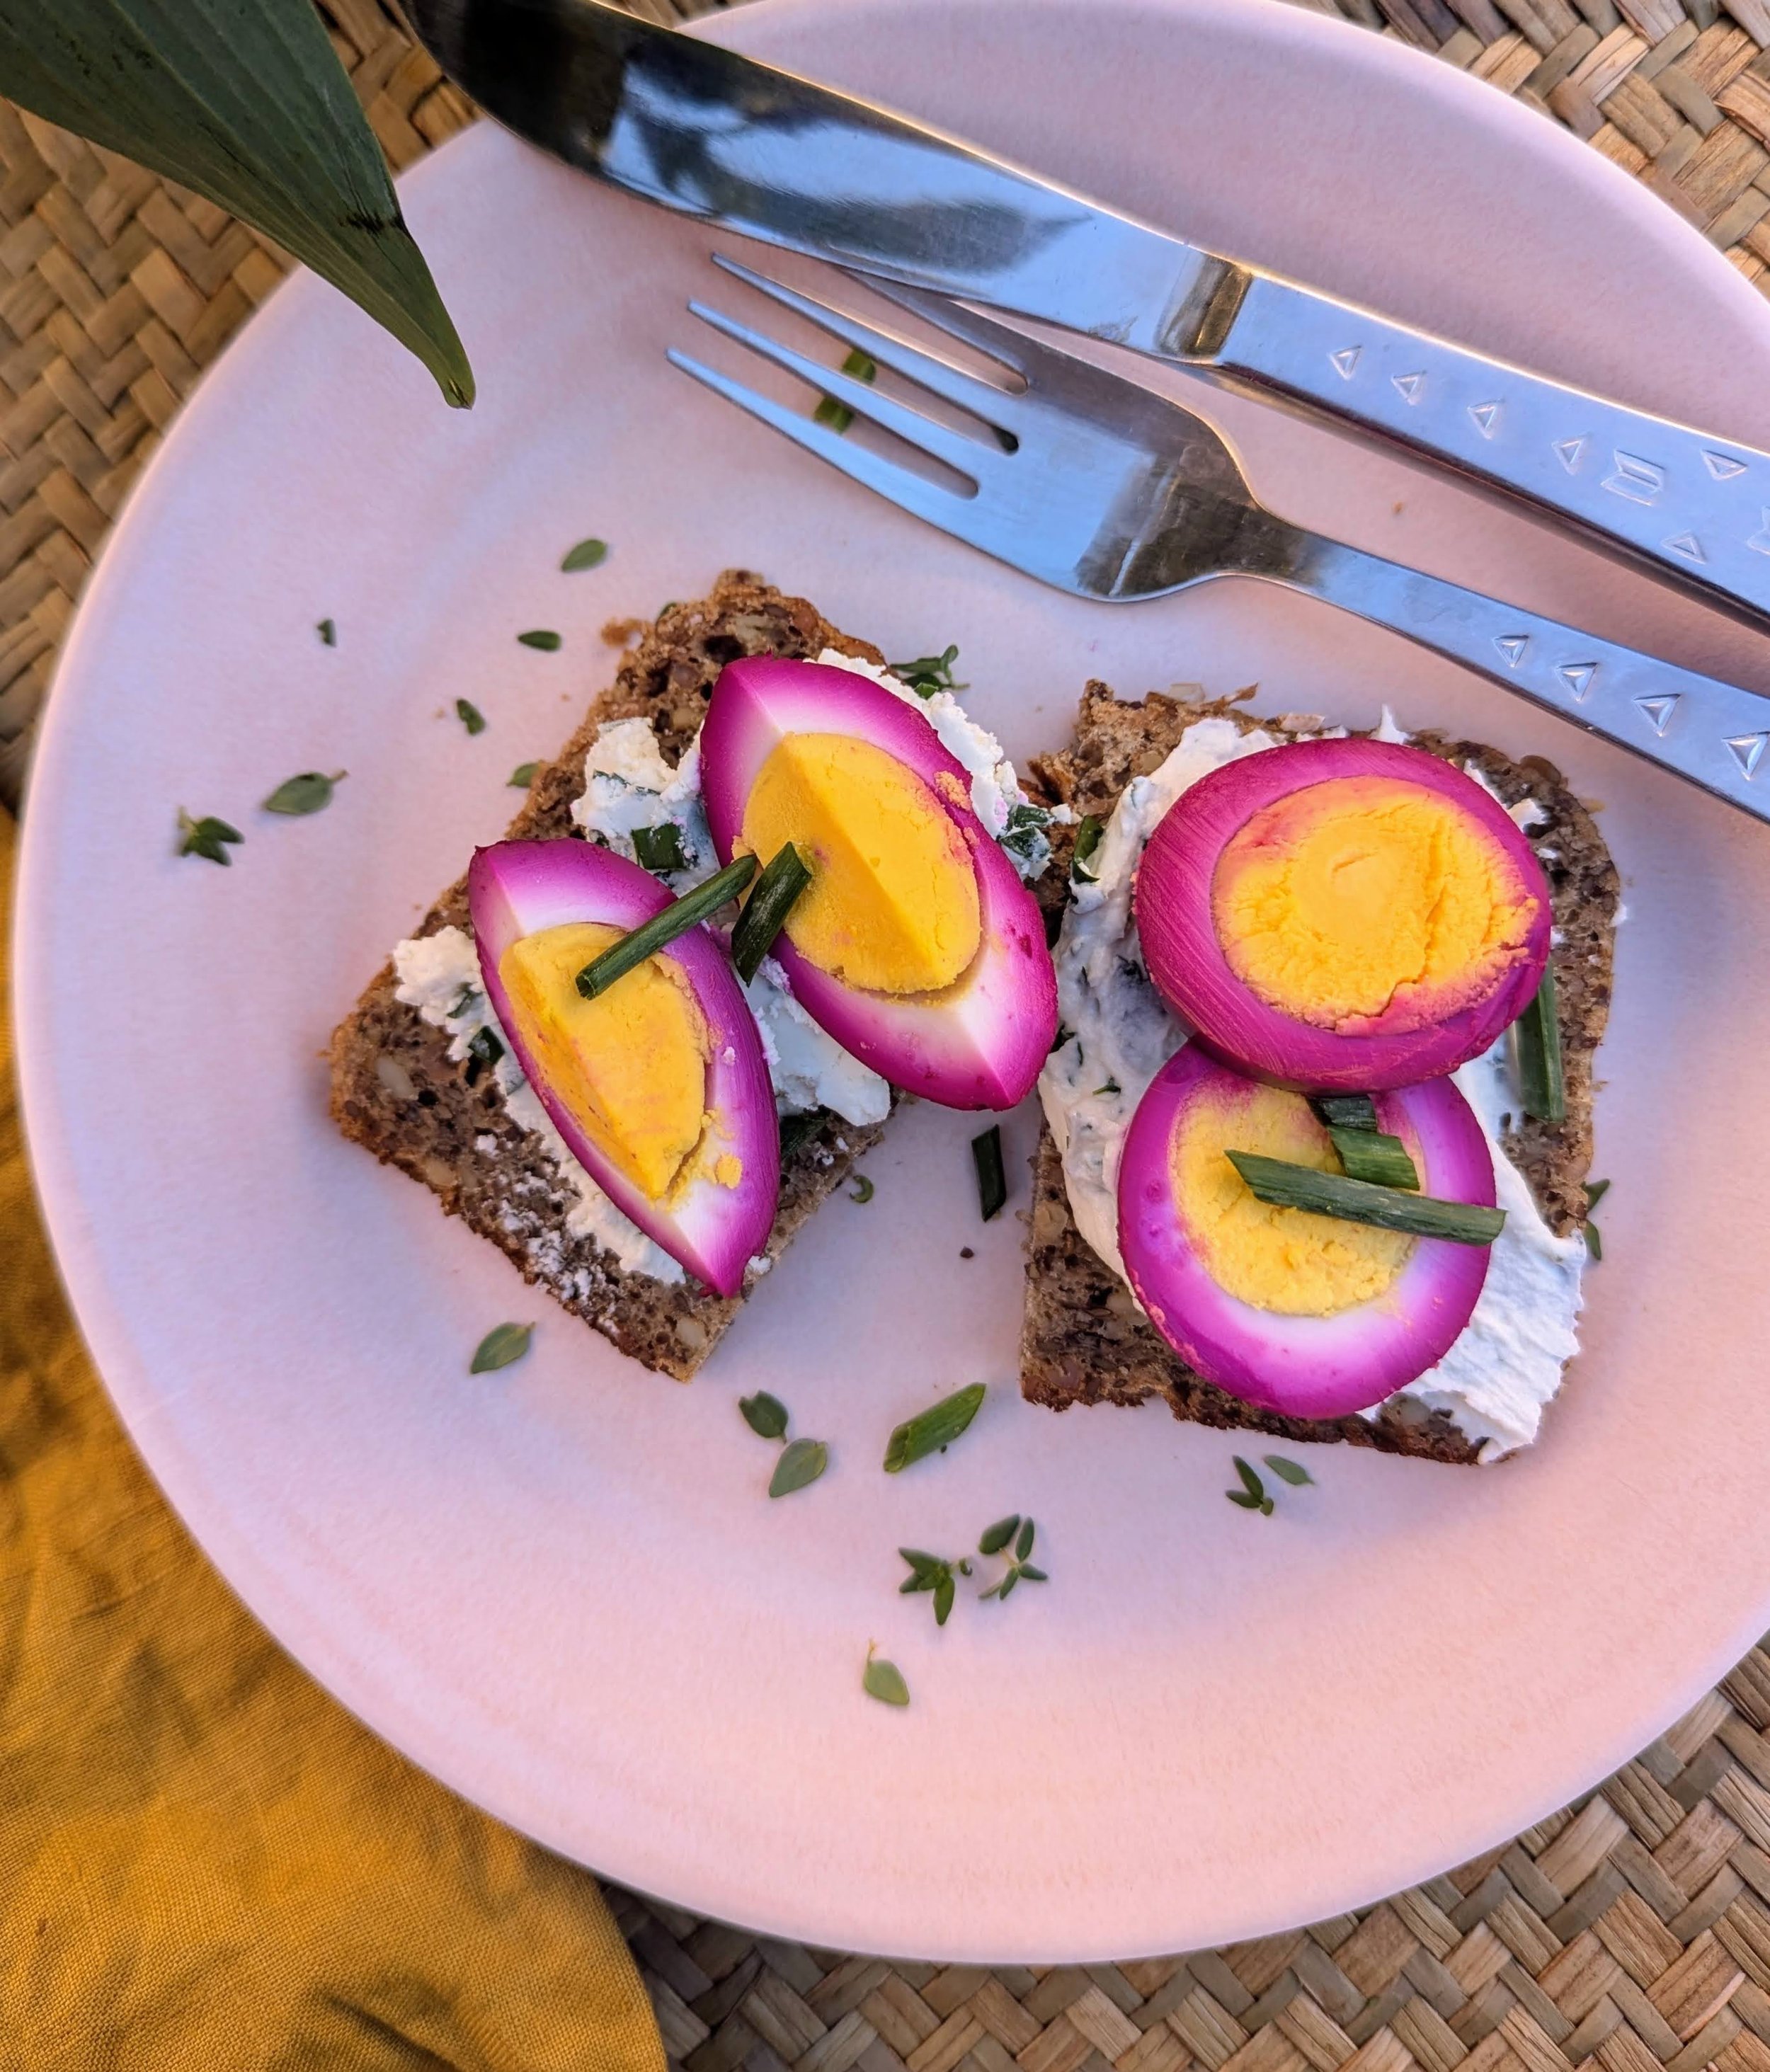
If you have leftover Pretty Pickled Beet Brine, try pickling hard-boiled eggs. It makes a delicious, brightly colored, and protein-packed snack.
The Pickled Egg
If you have leftover Pretty Pickled Beet Brine, try pickling hard-boiled eggs. It makes a delicious, brightly colored, and protein-packed snack.
Are you curious about pickled eggs? I can honestly say that it has not always appealed to me. Maybe because my first memory of pickled eggs was of a large ominous jar sitting on a back shelf of a neighborhood bar. I could never understand who was eating them and why. A can of Old Style with a side of hard-boiled eggs? Hmmm. I mean, what did they even serve them on, a cocktail napkin?
Well, I'm here to enlighten your tastebuds. They are pretty dang good. If you like hardboiled eggs, (which are an incredibly easy way to add protein to your diet), and if you like pickles then pickled eggs are worth trying. Plus they are easy to make and a fun color when you use leftover pickled beet brine.

Easy Peasy
Ingredients:
- Leftover Pretty Pickled Beet brine
- 6 hard-boiled eggs, peeled
Instructions:
1. Prepare the Eggs: Start by boiling your eggs until they reach your desired level of doneness. Once cooked, let them cool in an ice water bath to make peeling easier. Peel the shells off and set the eggs aside.
2. Utilize the Brine: Pour your leftover beet brine into a clean jar or container.
3. Add the Eggs: Gently place the peeled hard-boiled eggs into the jar filled with beet brine. Make sure the eggs are completely submerged in the brine for even coloring and flavor absorption.
4. Refrigerate: Seal the jar tightly and place it in the refrigerator. Let the eggs sit for at least 24 hours to absorb the flavors and achieve a vibrant pink hue. For even more intense flavor, you can let them sit for up to a week!
5. Enjoy: Once the eggs have marinated, enjoy them as a tangy snack. Slice them to add to a piece of toast, or serve them on a charcuterie board for a pop of color.
Tips:
- The longer you let the eggs marinate, the stronger the pickled flavor will be.
- The beet-brined eggs can typically last about 1-2 weeks in the fridge, so they’re perfect for meal prep or adding to lunches.
- Feel free to experiment with other brines if you have them on hand, like leftover Pretty Pickled El Diablo brine for a yellowish hue and a kick of spice!
“Pickled eggs are hard to beet! ”

The Best Advice For Peeling Eggs
Peeling eggs can be a drag. Especially when the egg sticks to the shell and you wind up with a cratered mess. Ugh, so frustrating. There is a better way, and I am here to share the good news.
To get that perfect hard-boiled egg, start by bringing the eggs to room temperature for about 30 minutes. This helps prevent rubbery whites. Believe it or not, older eggs are easier to peel so unless you are grabbing eggs from your backyard, don’t stress about buying the freshest eggs for this project.
Place the eggs in a large saucepan, cover with cool water about 1 inch above the eggs, and bring to a boil over medium heat. Once boiling, cover the pan and remove it from heat, letting the eggs sit for 12 minutes. Afterward, cool the eggs under running water to stop the cooking. To peel, gently tap the top and bottom on a countertop and roll with your palm to crack the shell. I like to then peel off the shell under cool running water.
Fun and Yum
This quick and easy recipe not only makes use of leftover brine but also offers a delicious way to add a pop of color and flavor to your breakfast toast in the morning. Whether you're a fan of beets or just looking for a fun kitchen project, pickled beet eggs are a tasty and visually striking option. So don’t let that brine go to waste—get pickling!
If you made this, love it, and find it very pretty to photograph, please share it on Instagram and tag us! www.instagram.com/prettyprovisioned

Asparagus Tart with Pretty Pickled Asparagus
A beautiful and simple tart made with puff pastry and a jar of Pretty Pickled Asparagus.
Our Pretty Pickled Asparagus makes a delicious snack right out of the jar, but I wanted to explore another way to use it. I decided to try Martha Stewart's asparagus tart recipe, and it turned out beautifully! The preparation was incredibly easy, just the way I like it, and the tart was visually stunning.
Instead of using Gruyère cheese, we opted for a cheddar and Gruyère mix from Trader Joe's. The slight tang from the pickled asparagus added the perfect touch of acidity to this cheesy, buttery tart. The pop of pink from the shallots was the... chef's kiss!

Working with puff pastry is very easy, and most grocery stores have it in the freezer section. Try finding a brand with all butter and minimal ingredients. Once the dough has thawed a bit, roll out the dough using the parchment paper it came with. Make sure to poke plenty of holes so that it doesnt puff up in the center. If it still does, it’s ok! Just press down the center lightly.

If you’re not close to San Diego and can’t grab a jar of our delicious pickled asparagus, no worries! We’ve got you covered with our Pretty Pickled DIY Pickling Packets. Pickling asparagus is super simple and fun, especially with some tips to guide you. We used our “Golden Child” DIY Pickling Packet for the asparagus, which can be found in our store. Just remember to give your asparagus at least a day to soak up that tasty brine.

“Asparagus inspires gentle thoughts.”

Asparagus Tart with Pretty Pickled Asparagus
Ingredients
- 1 sheet frozen puff pastry
- 5 ½ ounces (2 cups) Gruyère & Cheddar cheese, shredded
- 1 jar of Pretty Pickled Asparagus asparagus
- 1 tablespoon olive oil
- Salt and pepper
Instructions
- Preheat oven to 400°F. Roll the puff pastry in between two sheets of parchment into a rectangle
- Place pastry on a baking sheet lined with parchment. With a pastry scraper, lightly score pastry dough 1 inch in from the edges.
- Pierce dough with a fork within the marked rectangle at 1/2 inch intervals. Bake about 15 minutes until golden brown.
- Remove pastry shell from oven, and sprinkle with grated Gruyère & Cheddar.
- Place the pickled asparagus crosswise over the cheese alternating the direction of each spear. Sprinkle the remaining pickled shallots on top.
- Brush with oil, and season with salt and cracked pepper. Bake until spears are tender, 20 to 25 minutes.
This asparagus tart is not only simple to make but also makes for a stunning centerpiece at any gathering. The combination of the rich cheese, the tangy pickled asparagus, and the flaky pastry creates an irresistible dish that everyone will enjoy. Serve it warm as an appetizer or as part of a larger brunch spread. Enjoy!
Pretty Pickled Giardiniera: 3 Super Bowl Party Ideas
Three ways to use our yummy giardiniera this Super Bowl Sunday!
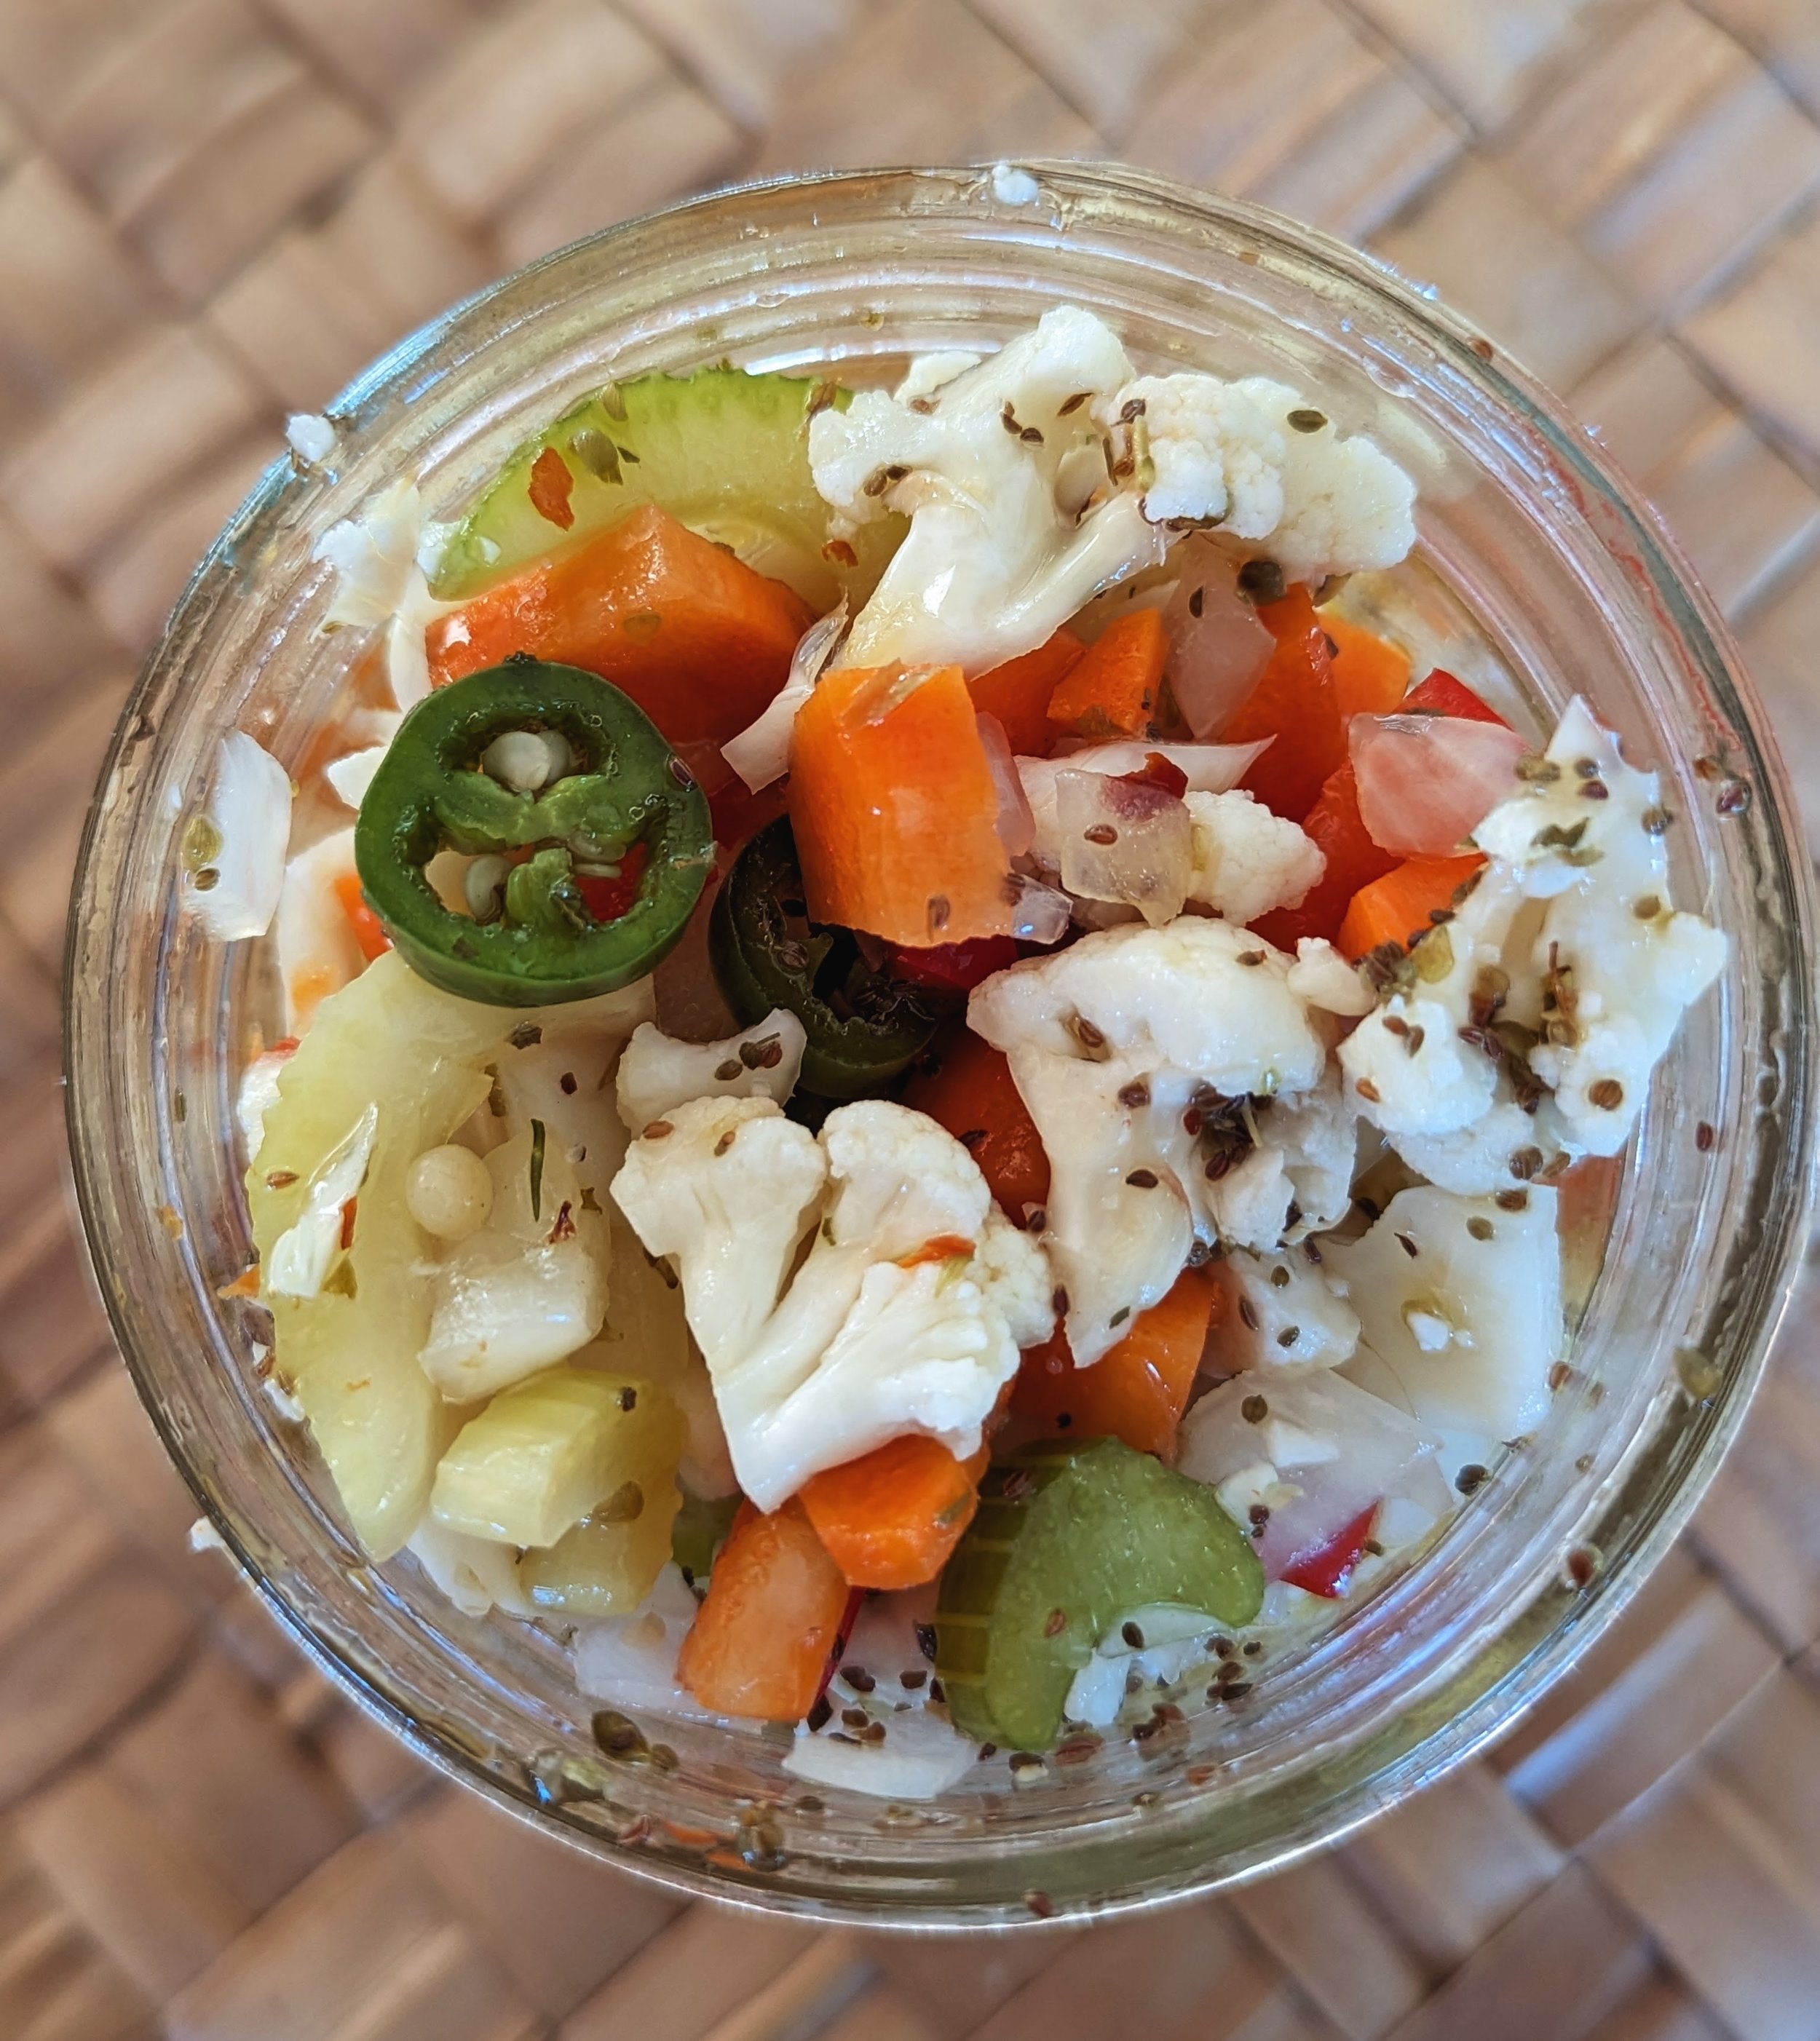
With the Super Bowl just around the corner, it's time to start planning what to serve at your party! If you're looking for a flavorful twist to elevate your dish, Pretty Pickled Giardiniera is the perfect ingredient. A recipe given to me by my brother is one of our most popular relishes. Here are three delicious ways to incorporate this full-of-flavor condiment into your Super Bowl feast:

Chicago-Style Roast Beef Sandwiches
If you have ever been to Illinois, (i.e Chicago), you know that the roast beef sandwich is a winner. Especially for game day. Use Pretty Pickled Giardiniera as a topping for Chicago-style roast beef sandwiches. The spicy crunch of the giardiniera perfectly complements the rich, savory flavors of roast beef. The most important question is, do you like it dipped or the gravy on the side? I like it dipped... my mom, not so much.
Quick Tip: Try the pressure cooker roast beef recipe from Pinch of Yum for an easy, melt-in-your-mouth goodness. Correction: This beef recipe is absolutely incredible!!! My family could not get enough. Layer pieces of roast beef on a soft Italian roll, melt a slice of provolone, and top with the giardiniera. Don’t forget to serve it with a side of au jus for dipping. So, so good. Your friends will be raving about these sandwiches long after the game ends!
2. Deviled Eggs
Elevate your classic deviled eggs by adding a spoonful of Pretty Pickled Giardiniera. Simply chop the giardiniera and mix it with the yolks, mayo, and mustard for a unique, savory flavor that will have your friends coming back for seconds.
Do you hate peeling eggs? I can totally relate. My go-to technique is tapping and breaking the top and bottom parts of the eggshell. Begin carefully peeling the egg under cold running water, starting from the larger end and working your way down.
Presentation Idea: Garnish each egg with an extra piece of giardiniera on top for a pop of color and added texture. Unless you have a cool deviled egg-holding plate, try placing the eggs on a bed of arugula to hold them in place. These bite-sized treats are sure to be a hit!

3. Pasta Salad Perfection:
When your friend asks for you to bring a salad to the party, try a pasta salad. It’s incredibly easy to make and 100% delicious. Mix cooked pasta with a generous amount of grated parmesan, rinsed garbanzo beans, and the entire jar of Pretty Pickled Giardiniera. I promise it’s so good it will be hard to stop tasting it. Your friend will thank you.
Presentation Idea: Drizzle over the top a bit more olive oil and grated parmesan.

These three ideas are not only easy to prepare but also bring a burst of flavor that’s perfect for a Super Bowl party. Grab a jar of Pretty Pickled Giardiniera, or maybe three, and get ready to impress your friends with these perfect game day dishes. Happy Super Bowl Sunday!

Stewed Yellow Split Peas w/ Pickled Beets
Stewed Yellow Split Peas are delicious, especially paired with pickled beets. Aside from being a nice break from perhaps your norm…it’s easy to make and good for you. Grab a jar of Pretty Pickled Beets and make this happen.

Recently, I had a great experience in Chicago when my family and I discovered the Time Out Market. As much as I love pizza, hotdogs, and roast beef sandwiches, I had my share and needed a break. The lively market had just about everything my family was craving. After making my rounds and checking out all the different food vendors, I decided on Ethiopian food. The little food booth named Demera served an amazing dish: stewed yellow split peas called Kim Alicha. It was paired with a beet salad, and it quickly became one of my favorite dishes I ate on this trip.
The combo of the tangy beets balanced with the warm and savory stew made it the perfect meal. The stewed peas were flavored with onion, turmeric, and ginger and served with injera, a soft bread used for scooping. This inspired me to recreate it at home, adding Pretty Pickled Beets and serving it on top of a mix of brown rice and quinoa. I am happy to share it was awesome. I loved it!
Check out the recipe below…

Beets Are Good For You!
Beets are pretty awesome for your health for a zillion reasons:
1. Packed with Nutrients: They’re low in calories but loaded with good stuff like fiber, folate, and vitamins C and B6.
2. Heart-Friendly: Those nitrates in beets can help lower blood pressure and improve blood flow, which is great for your heart.
3. Fight Inflammation: Beets are full of antioxidants and betalains that can help reduce inflammation in your body.
4. Boost Athletic Performance: The nitrates might even help enhance your workout by improving how your body uses oxygen.
5. Good for Digestion: With all that fiber, beets keep things moving in your digestive system.
6. Help Detox: They’re thought to support liver health and help your body detoxify.
7. Brain Boost: Some studies show that nitrates might improve blood flow to your brain, which could help with thinking and memory.
“Adding beets to your meals is easy—especially if you happen to have a jar of Pretty Prickled Beets! Just saying! ”

I vote you give this recipe a try! Stewed Yellow Split Peas are delicious, especially paired with pickled beets. Aside from being a nice break from perhaps your norm…it’s easy to make and good for you. Grab a jar of Pretty Pickled Beets and make this happen.

Stewed Yellow Split Peas
Ingredients
- 1 yellow onion, diced
- 2 tsp fresh ginger, grated
- 3 garlic cloves, minced
- 3 tbs of unsalted butter
- 1 tsp of ground turmeric
- 1 jalapeno sliced lengthwise
- 1/2 lb of yellow split pea
- 3 cups of water or chicken stock
- salt & pepper
Instructions
- Saute onions with butter until translucent, about 5-7 minutes
- Add garlic, ginger and turmeric, saute for 2 minutes, until fragrant
- Add water, (or chicken broth), salt, pepper and jalapeño.
- Bring to a boil, then let simmer stirring regularly for 35-45 minutes or until desired softness of the peas
- Adjust salt & pepper
If you made this, love it and find it very pretty to photograph, please share on Instagram and tag us! www.instagram.com/prettyprovisioned

Spicy Dill Pickle Chips
If you like Sriracha, you are going to love these spicy dill pickle chips. Try using the Pretty Pickled Barn Burning DIY Packet to make a spicy, tangy, and easy snack that any spicy lover will enjoy.

When I say some like it hot, I definitely am talking about my teenagers. They like everything spicy and tangy, so when I experimented with a Sriracha-style pickle, it was no surprise that the jar was devoured in minutes. I used the Pretty Pickled Barn Burning DIY Pickling Packet, and they were ready to pickle in my fridge in minutes. I'm not kidding; it was that easy.
When To Use?
I often recommend my pickles on a charcuterie board or tossed in a salad. These spicy dill pickles, however, seem more suited as a snack. Think…packed in your kid’s lunch. Or in a bowl on taco night. They taste like a Taki but are 100% natural and part raw veggie, so have confidence that you're eating something good for you. They are fun to eat just as they are, but if you are determined to put them on something great, I would suggest deli sandwiches, burgers, or fried chicken sandwiches. Maybe even on avocado toast.

Pickling Tips
I prefer to use a mandoline to slice the onions and cucumber. Another fun tool is the ripple-cut knife. You can find them on Amazon. It is easy to use and gives the cucumber a fun wavy texture. I like to make the brine first and stick it in the freezer to get nice and chilled before adding it to the veggies.
As far as which type of cucumbers, I used one organic English cucumber. It was the perfect amount for a 32oz jar. Immediately place in the fridge and sit for 12-24 hours before enjoying. This pickle is HOT!!! It may not be for everyone, but if you or someone you know likes a spicy treat, I promise they will love these.
I used equal parts vinegar and water for this recipe, which is a bit unusual for me. I did this because my son enjoys the tangy flavor that is more common in grocery store pickles.

Barn Burning DIY Pickling Packet
Barn Burning
The Pretty Pickled “Barn Burning” DIY Packet was named after my kid, who loves the chili lime Taki. Surprised? It is the perfect mix of chili pepper, habanero pepper, lime, sugar, and salt. The name "Barn Burning" also references Thomas Edison, who, as I recall, wanted to learn about fire and ended up burning down his barn. That is my kid, always exploring.
Check out other recipes using out our DIY Pickling Packets like “Golden Child” Pickling Packet or Mom’s Famous Pickling Packet to create something fresh, deliciously satisfying, and always interesting.
Check out our Provisional Store today to purchase Pretty Provisioned “Barn Burning” Pickling Packets, and get ready to make your perfect pickle at home. They are available in individual, three-pack, and six-packs.

Spicy Dill Pickle Chips
Ingredients
- Pretty Pickled "Barn Burning" DIY Pickling Packet
- 1 cup of apple cider vinegar
- English cucumber or several pickling cucumbers
- small yellow onion
- 5 garlic cloves
- handful of fresh dill
Instructions
- Sanitize your mason jar and lid
- Halve the onion and thinly slice
- Thinly slice garlic
- Carefully slice cucumber with a 1/4" mandoline
- Layer your mason jar with the pickles, onion, fresh dill and garlic
- Add vinegar and the entire packet to a cup of water of hot water. Stir to dissolve and pour over the vegtables in the jar.
- Screw the lid on tightly and carefully shake the mason jar
- Store in fridge overnight to several days
- Enjoy
If you made this, love it and find it very pretty to photograph, please share on Instagram and tag us! www.instagram.com/prettyprovisioned

Pickled Asparagus: The Perfect Snack
Pickled Asparagus is one of the easiest pickles to make and is surprisingly delicious. They are maybe the world’s most perfect snack.

Let’s get to the point…pickled asparagus is one of the easiest pickles to make and maybe the world’s most perfect snack. We sell a lot of pickled asparagus at the markets, which surprised me a little at first. Plus it is very simple to make and It literally takes no time at all. Yes, pickled asparagus is awesome on a charcuterie board, but 100%, it is perfect just to grab from the jar and snack on which is why I think it is the perfect snack!
Size Matters!
When making pickled asparagus…size matters! Unless you want to make something with a bunch of asparagus bits and pieces, like creamy asparagus soup, the size of the jar is important. Find a tall wide-mouth mason jar so that you keep the length of the asparagus spears in tack.
My favorite and easiest way to prep asparagus is by simply snapping off the end by bending the spears with your hands. Pretty much no need for a knife. The asparagus will break where you need it to and then you can discard the woody ends. Or if you are super particular, line up the tips and cut the ends so that they are perfect. Either way works. Depending on the size of the jar, you may need to trim the spears to fit vertically.
I prefer the thin asparagus, but not too thin because then they will be too wimpy and droopy. On the other hand, super thick asparagus is too frightening for me to use, so I just look the other way when I pass buy it in the grocery store. Move along and find the perfect size asparagus, not too thin but not too thick either. Picking up what I am putting down? Great!
My Favorite Ways To Serve Pickled Asparagus, (…other than eating it right out of the jar):
Tossed in a salad. Try it in an anti-pasta salad.
In an omelet or frittata. Paired with goat cheese…oh La la!
On a charcuterie board. Pairing it with aged Irish cheddar is my fav.
Chicken Picatta. Yes, tossed in with the capers. Life changing.
Put it in your next egg salad sandwich. The creaminess of the egg salad is perfect with the asparagus and then add a little chopped fresh dill. Yum!

“Asparagus inspires gentle thoughts.”
Pickling Tips
So of course, I always use Pretty Pickled DIY Pickling Packets. It just makes my life so much easier. I love the “Golden Child” Pickling Packet because of the beautiful yellow hue from the turmeric. However, the “Flower Child” or “Barn Burning” (if you like it hot), would work great as well. After I dissolve the packet into hot water, I add the vinegar and the cold water. Like I said earlier I usually snap the asparagus toward the bottom end of the stem and place as many as I can fit in the tall wide-mouth mason jar. I finely slice the shallot, which gives a delicate onion flavor, and the garlic into slivers and add to the jar. Lastly, I add finely chopped dill, and a pinch of chili pepper flakes. Replace the lid tightly, shake to distribute all the ingredients, and refrigerate for at least 12 hours.

Farm Fresh Veggies with Flower Power Pickling Packet
Asparagus is incredibly good for you. It’s loaded with nutrients and low in calories. An awesome source of vitamin K, and high in folate.
You’ve Got This!
The end result is a beautiful, crisp, and delicious pickle. I have heard many times that asparagus tastes much better pickled and I agree! It’s super easy and fun, but most importantly, it’s good for you.
Check out other recipes using our DIY Pickling Packets like “Pretty In Pink” Pickling Packet or Mom’s Famous Pickling Packet to create something fresh, deliciously satisfying, and always interesting.
Check out our Provisional Store today to purchase Pretty Provisioned “Golden Child” Pickling Packets and get ready to make your perfect pickle at home. Available in individual, three, and six-packs.

Pickled Asparagus: The Perfect Snack
Ingredients
- 1 "Golden Child" Pretty Provisioned DIY Pickling Packet
- 3/4 cup of white distilled vinegar
- 2 bunches of thin spears
- 1 shallot sliced very thin
- 2 garlic cloves sliced thin
- 1 pinch of red pepper flakes
- A couple of dill sprigs chopped fine
Instructions
- Remove woody ends of asparagus spears and discard. Trim spears to fit vertically in the jar
- Tuck onions, garlic, leftover pieces if any, dill, and pepper flakes into the jar
- Add an entire packet of "Golden Child" Pickling Powder to 2 cups of boiling water stir to dissolve completely
- Add vinegar and stir to combine
- Add hot brine to the jar making sure asparagus is completely submerged
- Place the lid tightly on the jar, shake, and refrigerate for 12-24 hours
Notes
- Sanitize your jars before use
- The vegetables and brine will take on a slightly pink color. The deepness and shade of pink will depend on the radish used
- Rice wine vinegar will work great as well.
If you made this, love it and find it very pretty to photograph, please share on Instagram and tag us! www.instagram.com/prettyprovisioned

The Most Elegant Pickled Radish
Create the most elegant pickled radish with the help of "Flower Power" Pretty Pickled DIY Pickling Powder and a few other easy-to-find summer vegetables. Add it to your favorite salad and impress your friends at your next dinner party.

Sometimes with a little imagination the simplest, and often underestimated and overlooked vegetable can be elevated into an elegant, Instagramable, pickle. With the help of our Pretty Pickled “Flower Power” DIY Pickling Packet - the radish and a few of its summer vegetable friends can be transformed into a lovely and colorful salad topper or an avocado toast topper or a taco topper. Honestly, whatever you choose to top it on we promise it is an easy and quick way to impress the most distinguished, (and Instagram-obsessed), guest. The most elegant pickled radish is basically a party in a jar. Some might even call it Pickle-Fetti because it’s pretty, colorful, and fun.
When To Use?
I did mention “elegant” and this is why. How many pickles have you had in your lifetime with lavender and rose in the brine? Probably none. The delicate floral note with slight acidity and a touch of sweetness might be how you describe a Chenin Blanc from Loire Valley. Ok, maybe not the sweetness part but you get what I am saying, right? This is not your Jewish deli half-sour pickle.
My Favorite Ways To Serve The Most Elegant Pickled Radish:
On top of goat cheese roasted with a handful of pistachios and grilled Italian bread
In a banh mi
Tossed in an arugula salad lightly dressed with lemon and olive oil and a sprinkle of blue cheese crumbles
On top of toast smeared with French butter…oh la la
Decorate the most Instagram-able avocado toast
Tossed in a pasta salad salad with a drizzle of pesto
Then there is the extreme pickle lover who eats it right out of the jar

“Plant a radish, get a radish, never any doubt. That’s why I love vegetables, you know what they’re about!”

Pickling Tips
I prefer to use a mandoline to slice the radish, carrot, and cucumber. The radish I slice thin enough to see through, the carrot about the same, and the cucumber a little thicker. The green beans I prefer to slice on the bias unless I am tired or in a hurry. It takes a little more poise to slice green beans just right but I feel the angular cut looks prettier in the mix. For the dill, I prefer to take the time to remove the stems and chop fine. Lastly, the shallots I slice as thin as possible with a chef's knife.
Tossing everything in a large bowl helps distribute all the veggies equally before filling the jars. The recipe makes enough for two 16oz jars or one 32oz jar. Make sure to add to the top, secure the lid tightly, and shake a few times. Immediately place in the fridge and let sit for 12-24 hours before serving. This pickle is a little more delicate than say a cucumber pickle so I try to use it within a week.
The brine I prefer cold to keep the veggies crisp so if you have time chill the prepared brine for at least an hour before you add it to the jar.

Farm Fresh Veggies with Flower Power Pickling Packet
Color Me Pretty
The color of the radish skin will decide the color of the brine. For the batch in the photos, I used a purple daikon radish I received as a gift from a local San Diego farm called Indian Summer Farms. They created a darker lavender color which is fun. A typical red radish you see in most grocery stores creates a pale pink color.
Check out other recipes using out our DIY Pickling Packets like “Golden Child” Pickling Packet or Mom’s Famous Pickling Packet to create something fresh, deliciously satisfying, and always interesting.
Check out our Provisional Store today to purchase Pretty Provisioned “Flower Power” Pickling Packets and get ready to make your perfect pickle at home. Available in individual, three, and six-packs.

The Most Elegant Pickled Radish
Ingredients
- 1 "Flower Power" Pretty Provisioned Pickling Packet
- 1/2 cup of white wine vinegar
- 1 bunch radishes
- 2-3 carrot
- 1 shallot
- Handful of green beans
- 1 small container or a handful of fresh dill
Instructions
- Add an entire packet of "Flower Power" Pickling Powder and 1/3 cup of hot water to a seperate jar
- Stir to dissolve completely
- Add vinegar and 1 1/2 cups of hot water
- Stir to combine
- Slice off the tops and bottoms of the radishes, then use a mandoline to slice the radishes into very thin rounds.
- Peel and slice the carrots with the mandolin into thin rounds
- Slice the cucumber again with the mandoline into thin rounds
- Slice the top and bottom of the shallot, remove the outer paper peel and slice thin slices with a chef's knife.
- Remove the ends of the green beans and slice on the bias 1/4 inch thick
- Remove the stems of the dill and roughly chop
- Toss everything in a large bowl with your hands making sure to seperate the radish slices and evenly distributing everything.
- Pack two 16oz or one 32 oz mason jar
- Add the cooled brine to fill completely, making sure everything is covered
- Place the lid tightly on the jar, shake, and refrigerate for 12-24 hours
Notes
- Sanitize your jars before use
- The vegetables and brine will take on a slightly pink color. The deepness and shade of pink will depend on the radish used
- Rice wine vinegar will work great as well.
If you made this, love it and find it very pretty to photograph, please share on Instagram and tag us! www.instagram.com/prettyprovisioned